
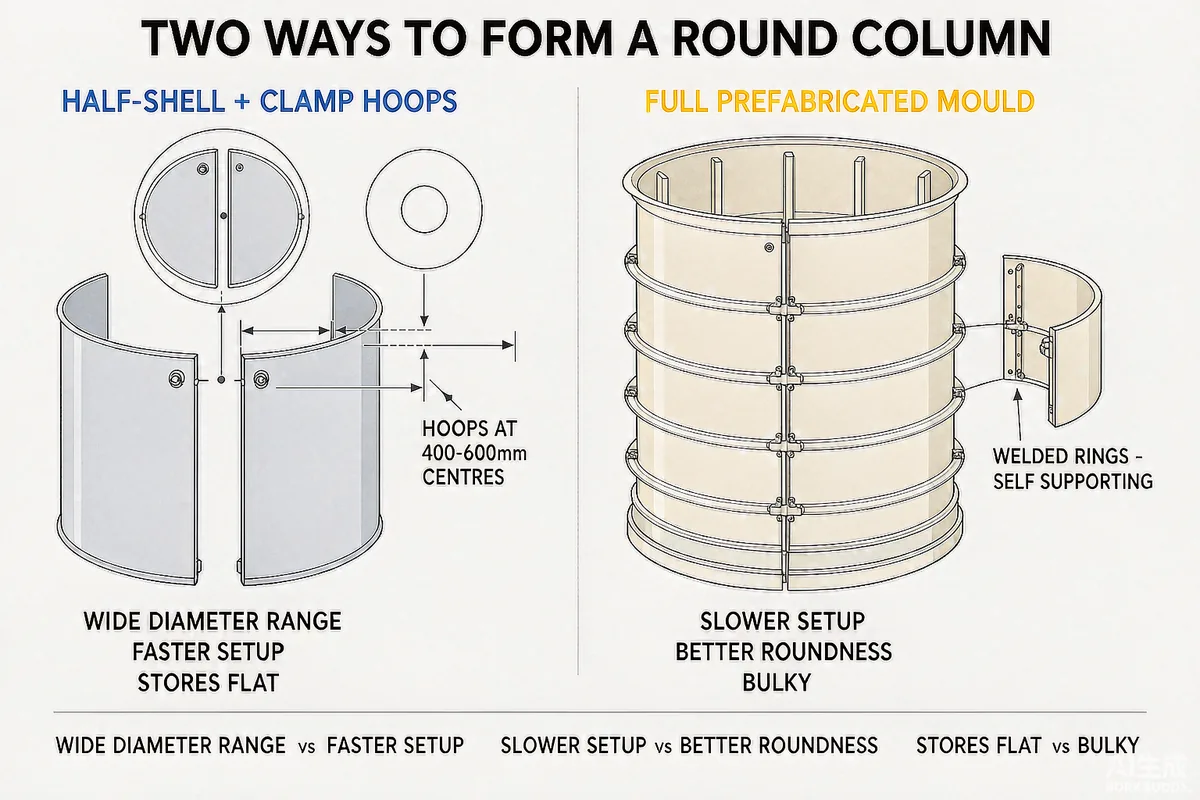
There are two established ways to form a round concrete column in steel, and the right one depends on a question that is easy to answer: how many different diameters will this formwork have to cover over its life?

The two systems
Half-shell moulds with clamp hoops. Two semicircular steel shells, positioned by horizontal clamp bands (hoops) bolted around them at intervals up the column. The shells carry the concrete pressure; the hoops hold the joint closed and keep the shells round.
Full prefabricated cylindrical moulds. A single cylindrical shell, usually split into two longitudinal halves with a hinge or a bolted seam, and with stiffening rings welded on at fixed intervals. Self-supporting — no separate hoops needed.
Comparison
| Half-shell + clamp hoops | Full prefabricated mould | |
|---|---|---|
| Diameter range from one set | Wide — same hoops serve 300–1200 mm shells | Fixed per mould |
| Setup time per column | Slower — 4 to 8 hoops to bolt | Faster — pre-set rings |
| Cost per diameter | Lower — you buy shells only | Higher, but self-contained |
| Max safe height | ~6 m with standard hoop spacing | 12 m + with engineered rings |
| Roundness control | Depends on hoop spacing and shell stiffness | Better — rings are welded true |
| Storage and transport | Compact — shells stack flat | Bulky |
| Best for | Contractors casting many diameters | High columns, one repeated diameter |
Choosing by diameter and height
Our rule of thumb, from quoting both systems for bridge and building work:
- 300–600 mm diameter, up to 4 m high — half-shell with hoops. Hoop spacing 500 mm for 300–400 mm columns, 600 mm for 450–600 mm. Shell thickness 3 mm is adequate below 500 mm diameter; go to 4 mm above.
- 600–1200 mm, up to 6 m — half-shell with hoops at 400–500 mm centres, shell 4-5 mm. Above 900 mm the shells get heavy enough that a two-person team struggles; plan for a lift or a third person.
- Anything over 6 m, or any column where roundness is specified — full prefabricated mould with welded stiffening rings. Hoop-based systems are difficult to keep round over that height because small hoop spacing errors accumulate.
- Pier columns with a capping beam — usually a hybrid: cylindrical mould for the shaft, plus a separate steel panel mould for the cap. Cast the shaft first, then cap. Trying to form both in one pour needs a purpose-designed mould and is rarely economical.
Pour pressure: the number that decides hoop spacing
The hoops exist to resist the outward pressure of wet concrete. That pressure depends on pour rate and on how quickly the concrete at the bottom starts to set:
| Column diameter | Pour rate | Max hoop spacing (4 mm shell) | Max hoop spacing (5 mm shell) |
|---|---|---|---|
| 400 mm | 1.5 m/hr | 700 mm | 800 mm |
| 600 mm | 1.5 m/hr | 550 mm | 650 mm |
| 800 mm | 2 m/hr | 450 mm | 550 mm |
| 1000 mm | 2 m/hr | 350 mm | 450 mm |
Two practical warnings. First, vibration is what actually bursts moulds, not static pressure alone — a poker vibrator held against the shell adds localised dynamic load far above the hydrostatic figure. Keep the poker 100 mm off the steel and rely on the concrete's own flow. Second, if your mix is designed for a long set time (slow-setting for hot weather), it stays fluid longer and exerts more pressure at the same pour rate. Reduce pour rate by roughly 25% for each hour of extra set time.
Stripping: the sequence matters
Columns are usually stripped the morning after casting, but the sequence is not optional:
- Release the hoops from the bottom up. The lowest hoops are under the greatest load but the concrete there is oldest and strongest. Working upward means each hoop you remove has less concrete above it than the one below.
- Never remove all hoops before separating the shells. With hoops off and shells still in contact, the column is unsupported against any lateral load — including a worker leaning on it.
- Crack the vertical seam first, then lift the shells apart. If the seam is frozen, tap the shell with a rubber mallet, not a hammer: a steel hammer will dent the panel and the dent will transfer to every subsequent column.
- Clean and oil every shell after each cast. Columns are usually a visible architectural element; a shell left with concrete residue will progressively lose its surface finish and start leaving marks by the fifth or sixth cast.
Cost per metre of column height
Indicative FOB pricing for comparison (2026, Q235B, standard finish):
| System | Per metre of column height | Notes |
|---|---|---|
| Half-shell set + hoops, 400 mm dia | USD 150 – 210 | Shells reusable, hoops shared across diameters |
| Half-shell set + hoops, 800 mm dia | USD 260 – 360 | Larger shells, more hoops |
| Full cylindrical mould, 400 mm dia | USD 220 – 300 | Self-contained, faster setup |
| Full cylindrical mould, 800 mm dia | USD 380 – 520 | Welded rings, engineered for height |
For a contractor who will cast four different diameters, the half-shell route plus a shared set of hoops is usually 30-40% cheaper overall than buying four prefabricated moulds, and it stores in a fraction of the space.
What to specify
- Column diameters and every height, including the tallest.
- Pour rate you intend to use, and pour method.
- Whether the column is exposed architectural concrete (finish matters) or buried (it does not).
- Concrete grade and slump.
- Whether you need tie holes or a specified tie pattern — for architectural work they must be symmetrical and evenly spaced.
- How you will lift and stand the mould, and whether you need a base collar and a top guide frame. The top guide is not decoration: on a 6 m column, it is what keeps the mould plumb while the concrete goes in.