
Box culvert moulds are the most common custom steel mould we build, and the most frequently mis-specified. Three design decisions cause almost all the problems we see in the field: how the inner core collapses, what pour rate the mould is rated for, and how thick the panels are. Each is fixed at the drawing stage and each is expensive to change later.

Decision 1: how the inner core collapses
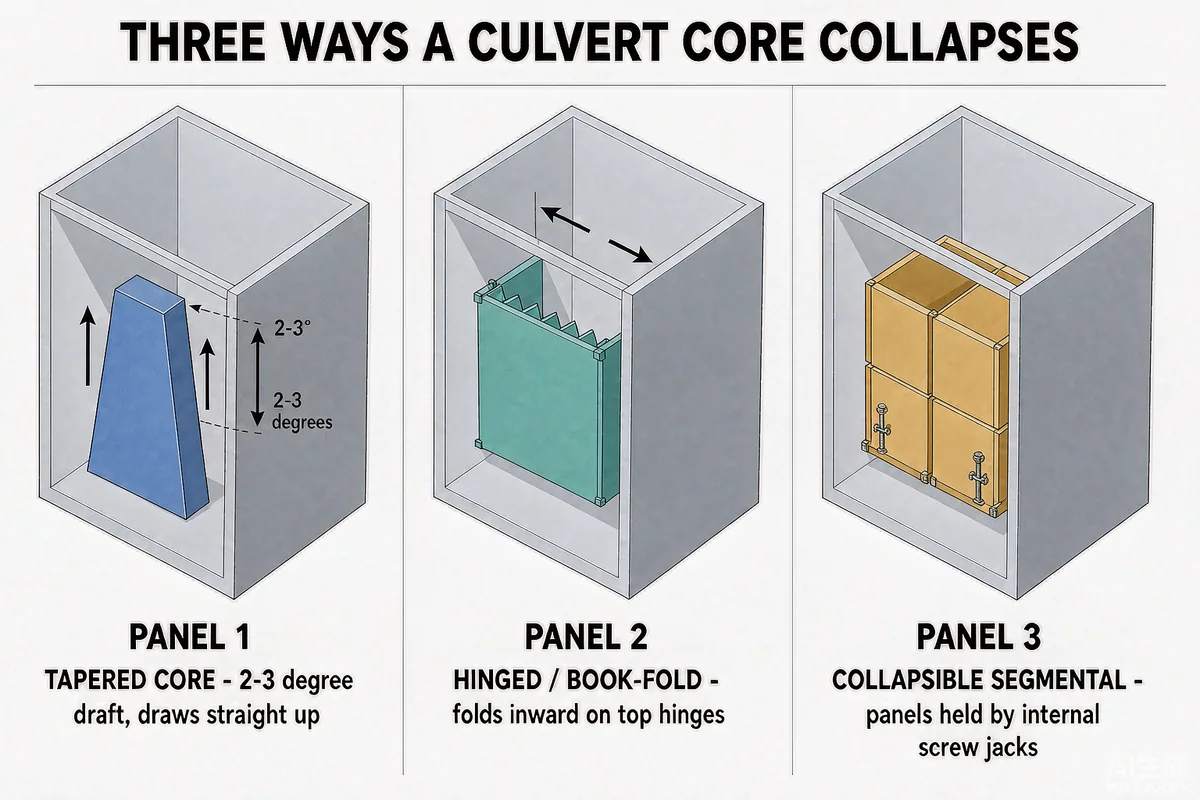
The core is the hard part. It is inside a closed box, so it cannot simply be lifted out — it has to shrink first. There are three methods, and the choice depends on your handling equipment:
| Method | How it works | Core shape limit | Handling needed |
|---|---|---|---|
| Hinged / book-fold | Core folds inward on hinges along the top, then lifts out | Rectangular, clear spans up to ~3.5 m | Overhead lift only |
| Tapered core | Sides are built with 2-3° draft; core draws straight up | Rectangular with open ends | Overhead lift only, cheapest option |
| Collapsible segmental | Core breaks into panels held by internal screw jacks or wedges | Any shape including round and arch | Operator access + lift |
For a standard 2-4 m span rectangular culvert, the tapered core is usually the best value — it removes the hinge mechanisms that need maintenance and eliminates the most common failure point. Hinged cores become necessary above roughly 3.5 m clear span, where the taper needed for a straight draw would make the core too small to be structurally sensible.
Collapsible segmental cores are the only option for circular and arch culverts. Expect them to add 25-40% to the mould cost versus a tapered rectangular core, because of the jacking hardware and the extra assembly time in the workshop.
Decision 2: pour rate and head pressure
This is the specification item buyers most often leave blank, and it is the one that determines whether the mould survives its first month.
Concrete exerts hydrostatic pressure. A 1.5 m deep pour of normal-weight concrete at 24 kN/m³ exerts roughly 36 kN/m² at the base if poured slowly enough to set from the bottom up. Pour fast and the full liquid head acts on the panel. The relationship:
| Panel thickness | Rib spacing | Rated pour rate | Safe head height |
|---|---|---|---|
| 4 mm | 400 mm | up to 1.5 m/hr | 1.5 m |
| 5 mm | 350 mm | up to 2.5 m/hr | 2.5 m |
| 6 mm | 300 mm | up to 4 m/hr | 3.5 m |
| 6 mm + double ribs | 250 mm | unrestricted (pump pour) | 5 m + |
Tell your supplier your intended pour rate before they draw the mould. If you plan to pump concrete into a 2 m culvert at 4 m/hr and the mould was built with 4 mm panels on 400 mm ribs, you will get visible panel deflection on the first cast and permanent deformation within five. We have replaced moulds for exactly this reason, and it is always cheaper to thicken the panel at the drawing stage than to rebuild later.
Decision 3: dimensional tolerances and what they cost
Standard workshop tolerance on a box culvert mould is ±3 mm on internal dimensions. That is achievable with jig-welded frames and is what most drainage specifications require.
Tighter than that, cost rises quickly:
- ±2 mm — adds roughly 15% to the price. Requires match-drilling the panel-to-frame connections and checking every unit on a surface plate.
- ±1 mm — adds 35-50%. Only justified for precast units that must stack with mechanical joints, or where a gasket groove is machined in.
- Squareness matters more than absolute dimension on culverts. Specify diagonal measurement tolerance (typically ±4 mm across the box) rather than only side lengths — a box that is dimensionally correct but out of square will not stack.
What customisation actually costs
Custom fabrication is not priced by weight alone. The cost drivers, in order of impact:
- Number of cores per mould set. A single mould with one shell and one core is the baseline. Adding a second core to double output adds roughly 60% of the base price — but doubles your daily cast rate, which usually pays for itself inside one month on a large contract.
- Hoist and lifting point design. Standard lifting lugs are included. If the mould must be handled by a specific crane with limited headroom, the lifting geometry has to be designed around it and adds 5-10%.
- Surface finish requirement. Standard mill finish needs no extra work. A 2B bright finish or a specified roughness (Ra 3.2 or better) requires pickling and additional surface preparation, adding 10-20%.
- Non-standard geometry. Any culvert that is not a straight rectangular box — haunched, skewed, splayed ends, multiple cells — moves the job from parametric drawing to full design. Budget 40-80% over the equivalent plain box.
- Bolted versus welded construction. Bolted panels cost about 12% more and are heavier, but allow partial replacement if one panel is damaged. For projects with a long casting programme and a risk of impact damage, that is usually worth it.
The specification checklist to send with an enquiry
Give us these nine items and you will get an accurate quotation on the first pass rather than three rounds of clarification:
- Internal dimensions of the finished culvert (span × height × length), and whether length is one piece or match-cast segments.
- Wall and base thickness.
- Number of cells.
- Required tolerance, and specifically whether squareness/stacking matters.
- Intended pour rate and pour method (bucket, pump, chute).
- Concrete grade and slump.
- How the finished unit is lifted from the mould and where it is stored.
- Casting programme: units per week and total units planned.
- Which end treatment: square ends, tongue-and-groove joints, or gasket recess.
A note on match-casting
If your culvert units need to join end-to-end, the usual method is match-casting: the female end of the new unit is cast against the male end of the previous one, using the hardened unit as the end shutter. This guarantees alignment without needing a machined joint, and it is far cheaper than specifying a machined tongue-and-groove on every unit.
Match-casting does require the mould length to be adjustable by one joint depth, usually 100-150 mm. Tell your mould supplier you intend to match-cast, because it changes the end-shutter design. Discovering it after the mould is built means a new end plate.